| SDK | Description |
|---|---|
| GenuinCore | Includes the core functionality of the Genuin Ecosystem: Embeds and User authentication. |
| GenuinUI | Additional UI flows like comments, search, deep-links, notifications, group/community detail etc. |
| GenuinCamera | Camera flows for video content creation. |
| GenuinAI | Additional flows for AI assisted community/group creation. |
Requirements
| Platform | Minimum Deployment Target | Language | Supported Orientations | Supported Destinations |
|---|---|---|---|---|
| iOS | 13.0 | Swift | Portrait | iPhone |
Permissions (Optional)
Permissions to be added ininfo.plist file of your application
| Permission | Usage | Used Where | In SDK |
|---|---|---|---|
| Camera (NSCameraUsageDescription) | Genuin needs permissions to open your camera and microphone. This allows Genuin to record videos that can be shared with other people. | Post, Video Comment | GenuinCamera |
| Microphone (NSMicrophoneUsageDescription) | Genuin needs permissions to open your camera and microphone. This allows Genuin to record videos that can be shared with other people. | Post, Voice Comment | GenuinCamera |
| Photos (NSPhotoLibraryUsageDescription) | Genuin needs permissions to access your photo library. This allows Genuin to download videos to your phone and save it to your library. | Post, Profile, Banner | GenuinCore |
| Speech Recognition (NSSpeechRecognitionUsageDescription) | The transcript of your recording will be displayed to you in the end for you to overlay it on the audio message. | To generate transcript from recorded audio | GenuinCamera |
| Contacts (NSContactsUsageDescription) | Genuin requires to sync with your contacts and provide a better experience when you wish to share your posts with them. | Add Members in Communities and Groups | GenuinUI |
| Location (NSLocationWhenInUseUsageDescription) | Your precise location will help us suggest your community details more accurately. | AI Powered Communities based on the User Location | GenuinCore |
| Tracking (NSUserTrackingUsageDescription) | Your data will be used to analyse ads we run! | Monetization | GenuinCore |
If any permission is not given then that particular feature will not be accessible in your app.
Installation
Using Swift Package Manager (SPM)
To add Genuin SDK to your iOS project via Swift Package Manager: 1. In Xcode, go to: File > Swift Packages > Add Package Dependency 2. When prompted, enter the Genuin SDK repository URL:- core - Can be used independently. It is the foundation for all other modules.
- ui - Requires core. Must be added together.
- camera - Requires both core and ui.
- ai - Requires camera, ui, and core.
Using Cocoapods
If your project doesn’t have the CocoaPods setup then start withpod init which will create the Podfile, else do following changes in the pod file to install GenuinSDK.
SceneDelegate/AppDelegate.
To load your lottie animation accross the Genuin SDK, you can add it here
configuration.setCustomLoader("YOUR_LOADER", bundle: .main)Instructions for SceneDelegate:
- Ensure you are using the
UISceneDelegatein your app. - In your
SceneDelegate.swiftfile, implement thescene(_:willConnectTo:options:)method. - Use the shared configuration and set up any custom loaders or additional parameters.
- Call
GenuinSDK.shared.initialize(apiKey: "YOUR_API_KEY", configuration: configuration)with your API key and the configured options. - Ensure that
GenuinSDK.shared.scene(scene, willConnectTo: session, options: connectionOptions)is called to notify the SDK of the scene connection.
Instructions for AppDelegate:
- In your
AppDelegate.swift, implement theapplication(_:didFinishLaunchingWithOptions:)method. - Set up the shared configuration and initialize the SDK with your API key.
- Call
GenuinSDK.shared.initialize(apiKey: "YOUR_API_KEY", configuration: configuration)with your API key and the configured options. - Return
trueto indicate successful launch configuration.
Instructions for SwiftUI:
In your SwiftUI’s App file initialize the GenuinSDK as follows:
Note: Our SDK is well optimized for
iOS version 15.0 and above, but if you are using iOS version 13 or 14 then put this if #available(iOS 15.0, *) condition while importing the GenuinSDK. Monetization
To enable Monetization use following code snippet to get advertisingIdentifier by AppTrackingTranspancy. You need to addNSUserTrackingUsageDescription in Info.plist as described here.
Need to declare in App Store Connect that your app is using Advertising DataSteps:
- Log in to your App Store Connect.
- Select the app you are working on.
- Go to App Privacy > Data Collection.
- Find the Usage Data section and select the Advertising Data.
- Click on Save/Publish.
- Now Setup Advertising Data by selecting (Third-Party Advertising, Analytics, Product Personalization, App Functionality, Other Purposes)
- Click on Next and give the answers as asked.
- Click on save.
Embed with Swift
Note: Make sure you have followed the installation steps in order to implement the Carousel Embed.
Note: In order to migrate from GenuinSDK 1.0 to 2.0, you need to replace
import GenuinSDK to import GenuinCore in your codebase. Carousel Embed
We have introduced new attributeGenuinEmbedAttributes that holds all the required data attributes needed to create and initialize an embed.
You can initialize it with the following parameters:
embedId: String– The identifier for the embed.uniqueId: String?(optional) – A unique identifier, if needed.viewController: UIViewController– The parent view controller for presenting the embed.ssoToken: String?(optional) – Single Sign-On token for authentication.params: [String: Any]?(optional) – Additional parameters for customization.contextualParams: [String: Any]?(optional) – Context-specific parameters for the embed.embedConfiguration: EmbedConfiguration(optional) – Configuration object for customizing embed behavior. Defaults to a new EmbedConfiguration instance.
Approach 01
Note: To fetch the Embed you need to add
YOUR_EMBED_ID, YOUR_CONTAINER_VIEW in which you want the embed, and YOUR_VIEW_CONTROLLER containing your container view, while calling the below function. For auto login in the SDK, you shall pass “YOUR_SSO_TOKEN” in order to implement Embed with SSO in your app. Approach 02
Initialize with Attributes During Creation Create theGenuinEmbedAttributes first, then pass it directly while initializing the embed view:
Approach 03
Initialize First, Then Set Attributes Create the embed view first and assign the attributes afterward:Approach 04
Adding the Embed View in a Storyboard Steps:- When using Interface Builder, first create a wrapper view with your preferred height and constraints. This wrapper will serve as the container for the
GenuinEmbedView. - Drag a
UIViewfor embed and add it inside your wrapper view. - Set the embed view’s class to
GenuinEmbedViewin the Identity Inspector. - If a module for the specified class does not appear , then set the module as
GenuinCorein the module field below the class. - Connect it to an
@IBOutletin your view controller (e.g.,embedView). - Example: Initialize and Load with an Outlet
- Call
loadEmbed()to initialize and load the embed.
Full Screen Embed
Note: To fetch the Embed you need to add
YOUR_EMBED_ID, YOUR_CONTAINER_VIEW in which you want the embed, and YOUR_VIEW_CONTROLLER containing your container view, while calling the above function. For auto login in the SDK, you shall pass “YOUR_SSO_TOKEN” in order to implement Embed with SSO in your app.Standard Wall Embed
Note: To fetch the Embed you need to add
YOUR_EMBED_ID while calling the above function.Embed with SwiftUI
Carousel Embed
Genuin Carousel Embed View WrapperStandard Wall Embed
Standard Wall View WrapperNote: To fetch the Embed you need to add
YOUR_EMBED_ID while calling the above function.Additional Information
To configure theEmbedConfiguration based on your need you can change the below values.
- isShowProfileEnabled = This is an optional boolean parameter. Default value is false. If this parameter is true and also if user is logged in than Profile picture will be visible in full screen view (right side top corner). On clicking the profile picture user will see the account settings and logout options.
- isDirectDeepLinkEnabled = This is an optional boolean parameter. Default value is false. If this parameter is true then all the interaction/clicks in the full screen view will redirect to the specific video in white labelled app associated with video and also value of this parameter “interactionDeepLink” will be ignored. If not passed then the regular flow will work.
- interactionDeepLink = This is an optional parameter. You can pass a deeplink URL in this parameter. If a deeplink URL is given then all the interaction/clicks in the full screen view will redirect to the deeplink URL given. If not passed then the regular flow will work. It should be a correct URL else user will not be redirected.
-
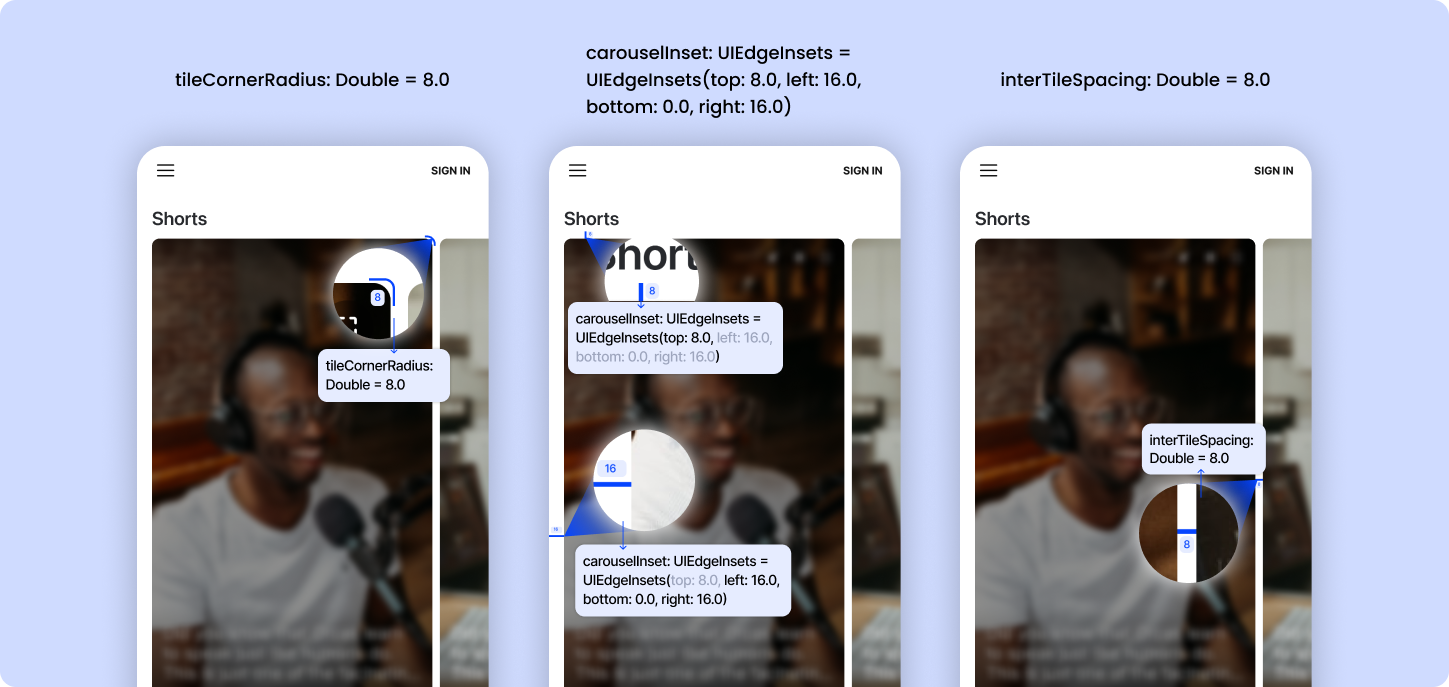
genuinCarouselConfiguration = This is an optional parameter. You can pass
GenuinCarouselConfigurationobject in this parameter. IfGenuinCarouselConfigurationis provided then the carousel design will change accordingly. The default values are listed below, which you can pass inGenuinCarouselConfigurationobject.interTileSpacing- spacing between the carousel’s collection view items. It’s default value is8.0viewInset- edge insets for carousel’s collection view. It’s default value isUIEdgeInsets(top: 8.0, left: 16.0, bottom: 0.0, right: 16.0)tileCornerRadius- cornerRadius for the carousel’s collection view items. It’s default value is8.0
 Below are the optional parameters for the
 params key:
-
name - This is an optional string parameter. Pass this parameter for ‘
signup/login’. -
mobile - This is an optional string parameter. Pass this parameter for
signup/login. -
email - This is an optional string parameter. Pass this parameter for
signup/login. - nickname - This is an optional string parameter. If nickname is available in genuin ecosystem it will be used, else genuin will generate of its own.
-
profile_image: This is an optional string parameter. Pass the
profile_imageparameter if you want to show the profile image in the SDK.
contextualParams key:
-
page_context - This is an optional string parameter. Pass this parameter for ‘
context’, so that feed could load based on that context. -
lat - This is an optional float parameter. Pass this parameter in
geoso that the feed could load based on the latitude and context. -
long - This is an optional float parameter. Pass this parameter in
geoso that the feed could load based on the longitude and context.
Note:
lat and long both parameters shall be passed in order to implement the contextual feed based on the location.Note: You can pass above parameters in
GenuinEmbedAttributes as wellPlacement with Swift
Note: Make sure you have followed the installation steps in order to implement the Carousel Embed.
Note: In order to migrate from GenuinSDK 1.0 to 2.0, you need to replace
import GenuinSDK to import GenuinCore in your codebase. GenuinPlacementAttributes which is used to hold all the necessary data for creating and initializing a placement view.
You can initialize it with the following parameters:
placementId: String– Identifier for the placement.styleId: String– Identifier for the placement style.uniqueId: String?(optional) – Unique identifier for this placement instance.viewController: UIViewController– Parent view controller that will present the placement.ssoToken: String?(optional) – Single Sign-On token for authentication.params: [String: Any]?(optional) – Additional parameters to customize the placement.contextualParams: [String: Any]?(optional) – Context-specific parameters for the placement.placementConfiguration: PlacementConfiguration(optional) – Custom configuration object. Defaults to a new instance of PlacementConfiguration.
GenuinPlacementView in following ways:
Approach 01
Initialize placementApproach 02
Initialize with Attributes During Creation Create theGenuinPlacementAttributes first, then pass it directly while initializing the placement view:
Approach 03
Initialize First, Then Set Attributes Create the placement view first and assign the attributes afterward:Approach 04
Adding the Placement View in a Storyboard Steps:- When using Interface Builder, first create a wrapper view with your preferred height and constraints. This wrapper will serve as the container for the
GenuinPlacementView. - Drag a
UIViewfor placement and add it inside your wrapper view. - Set the placement view’s class to
GenuinPlacementViewin the Identity Inspector. - If a module for the specified class does not appear , then set the module as
GenuinCorein the module field below the class. - Connect it to an
@IBOutletin your view controller (e.g.,placementView). - Example: Initialize and Load with an Outlet
- Call
loadPlacement()to initialize and load the placement.
Loading Embed and Placement Views in the Background
You can fetch data for an embed or placement view in the background as per your requirement and add it to your view hierarchy once the data is ready.Example: Loading an Embed in the Background
Example: Loading a Placement in the Background
Handle Login : via AutoLogin Approach
To Auto Login in the SDK, You need to call below method, whenever user is log in to your application. Note: You don’t need to call the below method if you have implemented the Embed With SSO already.
Custom Login
If you want to handle login process as per your requirement then follow the below steps: Step 1: Assign Delegate while initializing Genuin SDKHandle Logout : via AutoLogin Approach
Whenever user logs out from your application call the below method.Handling Deep Link
Note: Make sure you have followed the installation steps in order to handle the deep links.
- Make sure you have white labelled your community by following these steps
- Enable Associated Domains in Certificates, Identifiers & Profiles using your Apple Developer account at https://developer.apple.com/account/resources/identifiers/list
- Create apple-app-site-association (without extension) file with following settings:
https://YOUR_WHITE-LABELLED_DOMAIN/.well-known/apple-app-site-association
- Add Associated Domains in capabilities if not already,
YOUR_WHITE-LABELLED_DOMAIN
applinks: www.YOUR_WHITE-LABELLED_DOMAIN
To handle deep links in your app use the following methods.
Note:
GenuinSDK.shared.willHandleDeepLink(url: dlURL) function will check whether GenuinSDK will handle the given deeplink or not. You can use it according to your deeplink redirection flow.Instructions for SceneDelegate:
Handle deep links using the root view controller by calling GenuinSDK.shared.handleDeeplink(viewController: rootVC).
Instructions for AppDelegate:
Use GenuinSDK.shared.handleDeeplink(viewController: rootVC) to manage the deep link using the app’s root view controller.
Note:
-
To handle the Deeplink from another controller call the
GenuinSDK.shared.handleDeeplink(viewController: vc)function from specific controller -
If you are following the
SceneDelegatemethod then calling thisGenuinSDK.shared.handleDeeplink(viewController: self)function is mandatory
Optional LinkOutInterceptor
If you want to intercept Linkout clicks, you can implementGenuinLinkOutInterceptorDelegate as below:
Step 1: Assign Delegate GenuinLinkOutInterceptorDelegate:
Note:
ARRAY_OF_ASSOCIATED_DOMAINS_HANDLED_BY_YOUR_APP accepts associcated domains supported by your apps. You can pass comma seperated domains like e.g. [“apple.com”, “https://apple.com”, “www.apple.com”, “applinks:apple.com”]YOUR_ANY_CLASS can be class which you want to handle the delegate method in.Handling Push Notifications
Using Firebase
- Create an app in your firebase console by following these steps
-
Download the
GoogleService-Info.plistfile and add it in xcode project - Add pod in pod file
-
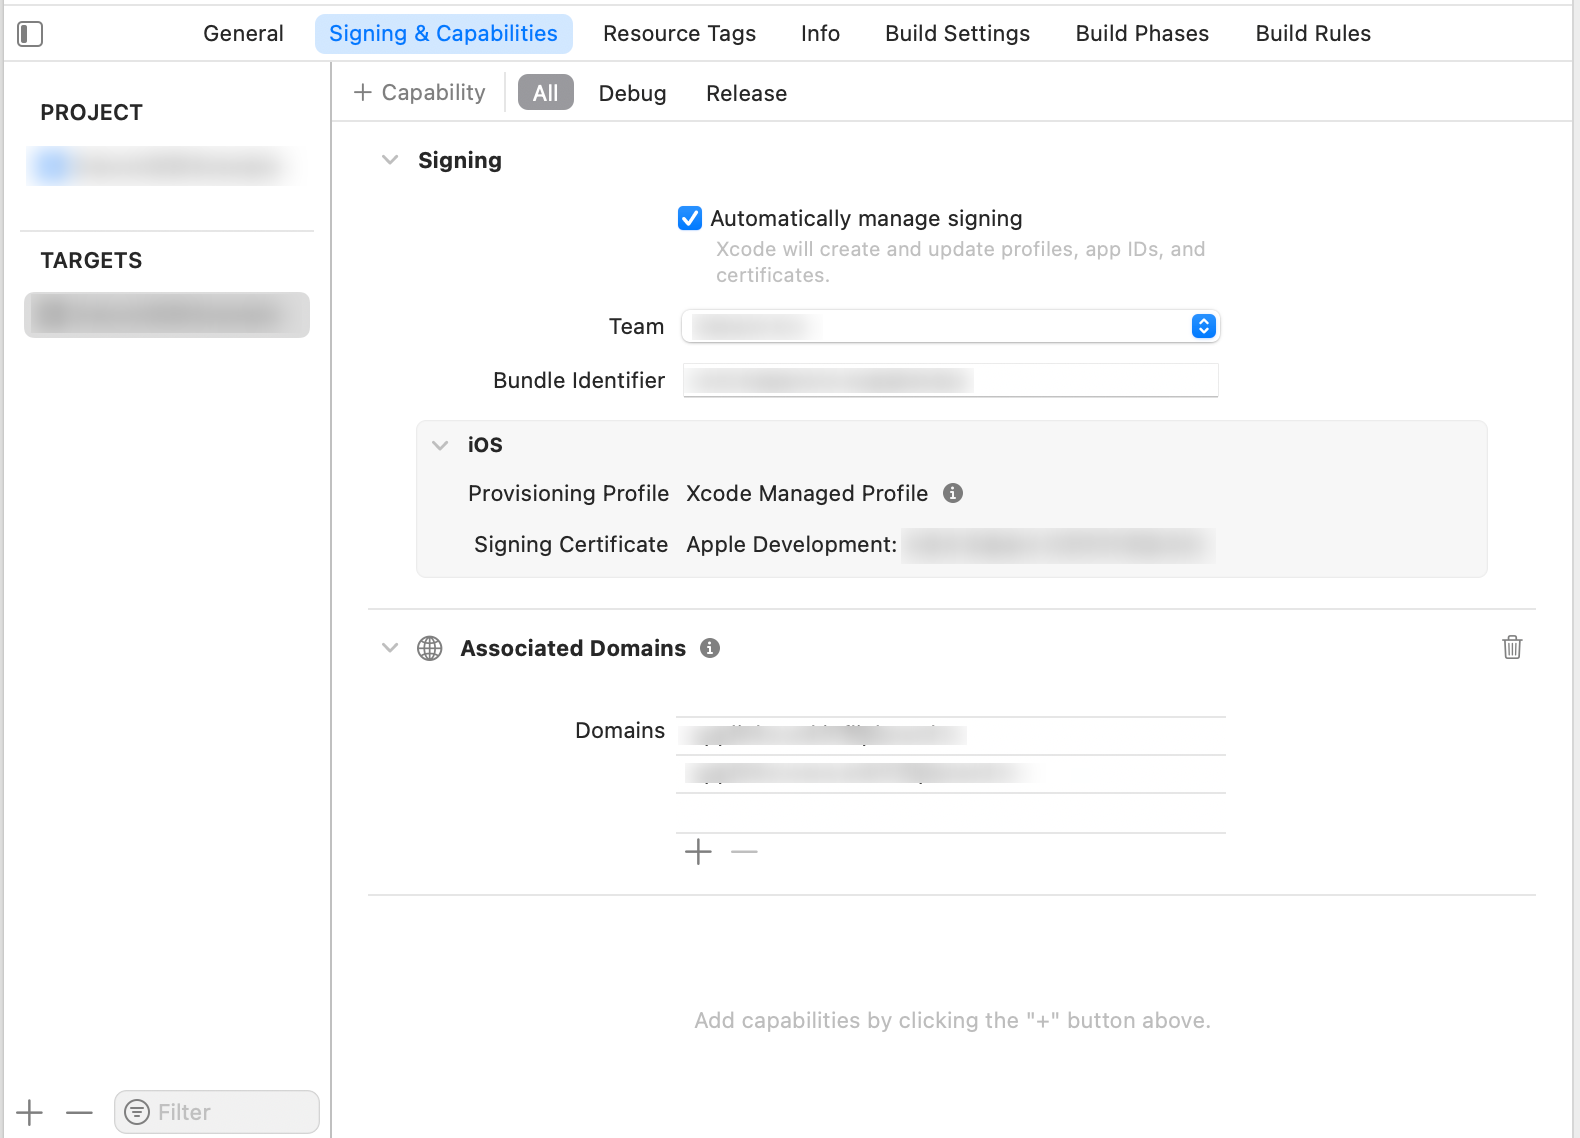
To enable the push notifications functionality then enable the Push Notifications in your target. To do so,
Select the target > Signing & Capabilities > Add Capability of Push Notification - Import
Note: Pass
true value in isFCMIntegrated parameter, as we are using the Firebase. - Initialize
- Place this code to take the user permission for Push Notification
- Extend
MessagingDelegateand Add follwing method:
- To Handle the Push Notification Redirection whenever the user taps, follow the below code
Note:
GenuinSDK.shared.willHandleNotification(userInfo: userInfo) function will check whether GenuinSDK will handle the given notification or not. You can use it according to your notification redirection flow. - To configure notification UI
- If you want to handle the notification when app is opened then follow the below code
Note: To handle the notification from another controller call the
GenuinSDK.shared.handleNotifications(viewController: YOUR_VIEW_CONTROLLER) functionUsing APNS
-
To enable the push notifications functionality then enable the Push Notifications in your target. To do so,
Select the target > Signing & Capabilities > Add Capability of Push Notification - Import
Note: Pass
false value in isFCMIntegrated parameter, as we are not using the Firebase. - Place this code to take the user permission for Push Notification
- To Handle the Push Notification Redirection whenever the user taps, follow the below code
Note:
GenuinSDK.shared.willHandleNotification(userInfo: userInfo) function will check whether GenuinSDK will handle the given notification or not. You can use it according to your notification redirection flow. - To configure notification UI
- If you want to handle the notification when app is opened then follow the below code
Note: To handle the notification from another controller call the
GenuinSDK.shared.handleNotifications(viewController: YOUR_VIEW_CONTROLLER) function. What’s next?
Android SDK
Integrate Android SDK in Your ecosystem.
Web SDK
Integrate Web SDK in your ecosystem.
React Native SDK
Integrate React Native SDK in your ecosystem.